flume+kafka+flink+mysql实现nginx数据统计与分析
https://juejin.cn/post/6937988947498762270
·
时序图

架构图

环境准备
- jdk: 1.8
- zookeeper版本:3.4.14
- kafka版本:kafka_2.12-2.3.1
- flume版本:apache-flume-1.8.0-bin.tar.gz
- 操作系统:CentOS Linux release 7.4.1708 (Core)
安装zookeeper
安装配置kafka
- 修改/etc/hosts,配置zookeeper域名解析

- 修改安装目录的应用配置文件/config/server.properties
- 设置zookeeper地址:
host设置为使用hostname而不是ip,避免连接缓慢zookeeper.connect=zk1:2181
2. 设置broker.id(在集群中必须唯一)broker.id=x- 设置日志文件存储位置(也可使用默认位置)
log.dirs=/xxx/xxx- 配置允许kafka远程访问
advertised.listeners=PLAINTEXT://172.23.x.x:9092- 其余配置
#禁止自动创建主题 auto.create.topics.enable=false #允许删除主题 delete.topic.enable=true - 在kafka安装目录输入以下命令启动kafka
bin/kafka-server-start.sh config/server.properties &
- kafka集群安装好后,在zookeeper安装目录执行以下命令连接zookeeper
./bin/zkCli.sh -server zk1:2181
- 通过zookeeper节点查看kafka状态
命令
ls /brokers/ids
结果
创建topic
- 在kafka安装目录执行以下脚本:
bin/kafka-topics.sh --create --zookeeper 172.23.x.x:2181 --replication-factor 1 --partitions 2 --topic nginx-log
- 创建成功后,在当前目录输入命令查看topic分片情况
bin/kafka-topics.sh --describe --zookeeper 172.23.x.x:2181 nginx-log

topic被存储在2个分区中,并且只有一个leader副本,不做冗余备份。
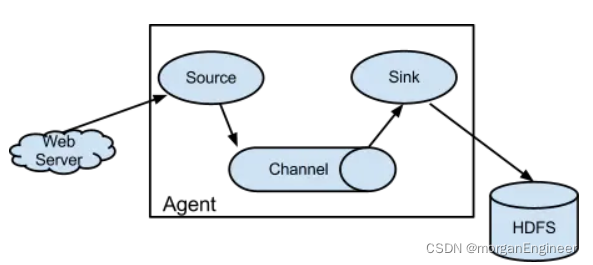
使用flume
-
架构图
-
安装flume
-
官方配置文档
https://flume.apache.org/releases/content/1.8.0/FlumeUserGuide.html -
配置agent,数据输出到终端,以便验证方案是否可行
- 新建文件/etc/flume/nginx-log.conf(也可从安装目录的配置模板conf/flume-conf.properties.template开始),配置如下。
aNginx1.sources = rNginx1 aNginx1.sinks = kNginx1 aNginx1.channels = cNginx1 #配置source组件aNginx1 aNginx1.sources.rNginx1.type = exec aNginx1.sources.rNginx1.command = tail -f /var/log/nginx/access.log # Each sink's type must be defined aNginx1.sinks.kNginx1.type = logger # Each channel's type is defined. # 描述和配置 channel 组件,此处使用是内存缓存的方式 aNginx1.channels.cNginx1.type = memory # Other config values specific to each type of channel(sink or source) # can be defined as well # In this case, it specifies the capacity of the memory channel aNginx1.channels.cNginx1.capacity = 1000 aNginx1.channels.cNginx1.transactionCapacity = 100 #配置 source、channel、sink 之间的连接关系 aNginx1.sources.rNginx1.channels = cNginx1 aNginx1.sinks.kNginx1.channel = cNginx1- 在安装目录执行如下命令启动(将日志输出终端)
bin/flume-ng agent --conf conf --conf-file /etc/flume/nginx-log.conf --name aNginx1 -Dflume.root.logger=INFO,console &- 再访问Nginx,观察终端输出效果判断是否抓取到nginx日志。
-
配置agent,数据输出到kafka
aNginx1.sources = rNginx1
aNginx1.sinks = kNginx1
aNginx1.channels = cNginx1
#配置source组件aNginx1
aNginx1.sources.rNginx1.type = exec
aNginx1.sources.rNginx1.command = tail -f /var/log/nginx/access.log
#调优参数
aNginx1.sources.rNginx1.batchSize = 2000
aNginx1.sources.rNginx1.batchDurationMillis = 1000
aNginx1.sinks.kNginx1.batchSize = 2000
aNginx1.sinks.kNginx1.batchDurationMillis = 1000

# 配置kafka
aNginx1.sinks.kNginx1.type = org.apache.flume.sink.kafka.KafkaSink
aNginx1.sinks.kNginx1.brokerList = 172.23.x.x:9092, 172.23.x.x:9092
aNginx1.sinks.kNginx1.kafka.topic = nginx-log
#压缩
aNginx1.sinks.kNginx1.kafka.producer.compression.type = snappy
#设置序列化方式
aNginx1.sinks.kNginx1.serializer.class = kafka.serializer.StringEncoder

# 描述和配置 channel 组件,此处使用是内存缓存的方式
aNginx1.channels.cNginx1.type = memory
# Other config values specific to each type of channel(sink or source)
# can be defined as well
# In this case, it specifies the capacity of the memory channel
aNginx1.channels.cNginx1.capacity = 3000
aNginx1.channels.cNginx1.transactionCapacity = 1000
#配置 source、channel、sink 之间的连接关系
aNginx1.sources.rNginx1.channels = cNginx1
aNginx1.sinks.kNginx1.channel = cNginx1
- 在安装目录执行如下命令启动(指定日志输出到文件,日志文件配置见安装目录的conf/log4j.properties)
bin/flume-ng agent --conf conf --conf-file /etc/flume/nginx-log.conf --name aNginx1 -Dflume.root.logger=INFO,LOGFILE &
使用flink
- 安装依赖
<properties>
        <flink.version>1.10.3</flink.version>
        <lombok.version>1.18.10</lombok.version>
        <fastjson.version>1.2.49</fastjson.version>

        <maven.compiler.version>3.5.1</maven.compiler.version>
        <project.build.sourceEncoding>UTF-8</project.build.sourceEncoding>
        <project.reporting.outputEncoding>UTF-8</project.reporting.outputEncoding>
        <maven.compiler.encoding>UTF-8</maven.compiler.encoding>
    </properties>

    <dependencies>
        <dependency>
            <groupId>org.apache.flink</groupId>
            <artifactId>flink-java</artifactId>
            <version>${flink.version}</version>
        </dependency>
        <dependency>
            <groupId>org.apache.flink</groupId>
            <artifactId>flink-clients_2.12</artifactId>
            <version>${flink.version}</version>
        </dependency>
        <dependency>
            <groupId>org.apache.flink</groupId>
            <artifactId>flink-streaming-java_2.12</artifactId>
            <version>${flink.version}</version>
<!--            <scope>provided</scope>-->
        </dependency>
        <dependency>
            <groupId>org.apache.flink</groupId>
            <artifactId>flink-jdbc_2.12</artifactId>
            <version>${flink.version}</version>
            <scope>provided</scope>
        </dependency>
        <dependency>
            <groupId>org.apache.flink</groupId>
            <artifactId>flink-connector-kafka_2.12</artifactId>
            <version>${flink.version}</version>
        </dependency>

        <dependency>
            <groupId>org.projectlombok</groupId>
            <artifactId>lombok</artifactId>
            <scope>provided</scope>
            <version>${lombok.version}</version>
        </dependency>
        <dependency>
            <groupId>com.alibaba</groupId>
            <artifactId>fastjson</artifactId>
            <version>${fastjson.version}</version>
        </dependency>
        <dependency>
            <groupId>log4j</groupId>
            <artifactId>log4j</artifactId>
            <version>1.2.17</version>
        </dependency>
        <dependency>
            <groupId>org.slf4j</groupId>
            <artifactId>slf4j-log4j12</artifactId>
            <version>1.7.25</version>
        </dependency>
    </dependencies>
- 编写flume从kafka抓取nginx日志
// 构建流执行环境
        final StreamExecutionEnvironment env = StreamExecutionEnvironment.getExecutionEnvironment();

        // kafka 配置
        Properties props = new Properties();
        props.put("bootstrap.servers", "172.23.x.x:9092,172.23.x.x:9092");
        props.put("zookeeper.connect", "zk1:2181");
        props.put("group.id", "flink");
        props.put("client.id", "flink-1");
        props.put("key.deserializer", "org.apache.kafka.common.serialization.StringDeserializer");
        props.put("value.deserializer", "org.apache.kafka.common.serialization.StringDeserializer");
        //当各分区下有已提交的offset时,从提交的offset开始消费;无提交的offset时,消费新产生的该分区下的数据
        props.put("auto.offset.reset", "latest");
        props.put("enable.auto.commit", "true");

        DataStreamSource<String> dataStreamSource = env.addSource(
                new FlinkKafkaConsumer<String>(
                        "nginx-log",
                        new SimpleStringSchema(),
                        props))
                //单线程打印,控制台不乱序,不影响结果
                .setParallelism(1);

        //从kafka里读取数据
        dataStreamSource.timeWindowAll( Time.seconds(5L) ).apply(new AllWindowFunction<String, List<String>, TimeWindow>() {
            @Override
            public void apply(TimeWindow window, Iterable<String> iterableValues, Collector<List<String>> out) throws Exception {
                List<String> strList = Lists.newArrayList(iterableValues);
                if ( strList.isEmpty() ){
                    return;
                }
                strList.forEach( System.out::println );
            }
        });
        env.execute("nginx log analyse running");
-
抓取结果
 4. 持久化到数据库
- 新增下沉类,用于保存统计结果
/** * @function:jdbc持久化器 */ public class JdbcPersistence extends RichSinkFunction<List<String>> { @Override public void invoke(List<String> values, Context context) throws Exception { //TODO 解析日志 for (String log : values) { System.out.println(log); } //TODO 构建统计结果 //TODO 入库 } }- 挂载下沉类到flume启动器
//从kafka里读取数据 dataStreamSource.timeWindowAll( Time.seconds(5L) ).apply(new AllWindowFunction<String, List<String>, TimeWindow>() { @Override public void apply(TimeWindow window, Iterable<String> iterableValues, Collector<List<String>> out) throws Exception { List<String> strList = Lists.newArrayList(iterableValues); if ( strList.isEmpty() ){ return; } out.collect(strList); } }).addSink( new JdbcPersistence() );////sink 到数据库 -
flume工程代码
https://download.csdn.net/download/qq_41633199/85188566

Kafka开源项目指南提供详尽教程,助开发者掌握其架构、配置和使用,实现高效数据流管理和实时处理。它高性能、可扩展,适合日志收集和实时数据处理,通过持久化保障数据安全,是企业大数据生态系统的核心。
更多推荐


 0
0 0
0- 0


 已为社区贡献3条内容

所有评论(0)